Columbia’s Silver Ridge Convertible Nylon Pant: Goes Anywhere Perfectly


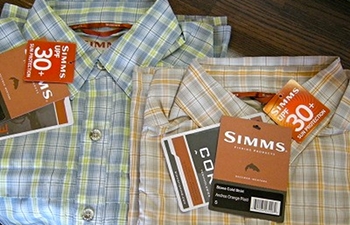
Never thought you could wear one specific pair of pants in so many environments. I’m so fortunate to have stumbled across Columbia’s Silver Ridge Convertible nylon pant . It’s so easy to get in and out of the water with these, and stay cool. This is the perfect pant for many South Florida conditions – from warm environments and extended sun exposure, to buggy treks through the mangroves, they get the job done and comfortably.

This Columbia pant has a partial elastic band in addition to wide belt loops. The pant comes with a thin-gauge nylon belt and Nifco polyoxymethylene (POM) buckle. Pockets are abundant and are all low profile. These include two front OMNI-WICK pockets, two back OMNI-WICK pockets, one left side (mid-leg) zippered pocket, and one right side (mid-leg) pocket. The convertible option allows for unzipping each pant-leg, offering a solution for shorts.

GREAT FEATURES

KEEP YOU COOL – When it comes to Florida heat and humidity, I look for a pair of these light weight nylon pants. It’s not just the heat and humidity either, I use these for staying out of the sun and for keeping bugs away. They have really become my go-to pant. Not sure how I stay so cool. I simply can’t imagine wearing anything thicker or heavier. Florida is really a place for shorts. If shorts are your thing, then you are also wearing sunscreen or bug juice. I can’t say I am into either of those, however would gladly wear these lightweight nylon pants to solve all the environmental challenges.

UPF 50+ – Columbia has constructed the pant with their UPF 50+ OMNI-SHADE sun protection. Not sure we need to say more on this.

DRY SUPER FAST – Columbia uses their OMNI-WICK fabric for pocket lining and such. This keeps water running off and away from the body. It works pretty well, keeping the air flowing between your skin and the pant material. After coming out of waist deep water on a hot breezy day, I can usually dry out within 45 minutes. If you towel off it’s even faster.

CONVERTIBLE – OPTION FOR SHORTS – This goes without saying. Nothing like removing the pant-leg to increase air flow. Always great to have this option. If you wish to increase air flow slightly in the legs, simply unzip each leg just a bit (maybe 30% or so).

SOFT TO THE TOUCH – I’m sure the lightweight rip-stop nylon has been softened by some process. Can’t put a finger on it, however there is a softness to the material that makes the pant comfortable at any point in the day, or night.

CLASSIC CUT/ STYLE – With relation to style, the pant has an active looking cut, somewhere balanced between sporty and casual. Not too baggy and not too tight. This allows options for dressing it up or keeping things casual.

GREAT COLORS – Columbia offers all the typical shades of grey, blue, and of course black. They also offer all the natural colors, from light creams, tans, and beige to rusts, browns, and greens. The colors are great for blending into the environment (i.e. Bonefish flats, arid deserts, dark forests, etc.). For fishing the flats and all, keep to the light natural colors.

SUPER LIGHT WEIGHT – For most of us in Florida, it’s great to have the option of wearing pants in year-round heat. Some may ask, why pants? More than anything, I think it comes down to keeping out of the sun and away from bugs (mosquitoes). What makes this pant an option is how lightweight they are, offering a way to keep cool in the heat.

EASY TO PACK – It must be the low profile, lightweight, nylon part of these which gives them such a minimal footprint. I think you could roll these up in something resembling the circumference of a French baguette. Perfect to pack for traveling where gear weight becomes a concern.

POSSIBLE IMPROVEMENTS

I suppose I am more of a critic than most – it might simply be my quest to find great gear with a balance of form and function. Following are a few challenges I encountered and how they were addressed.

[row][column size=’2/3′]
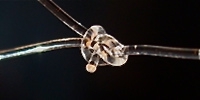
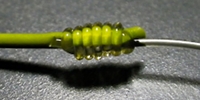
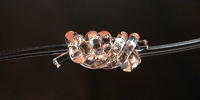
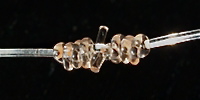
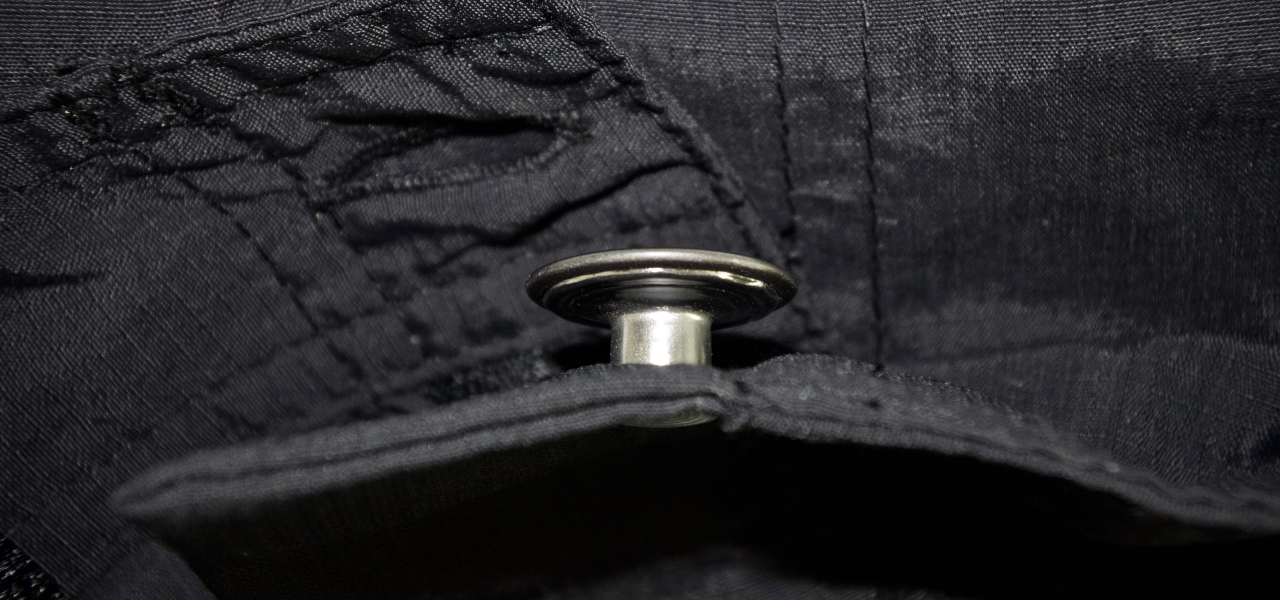
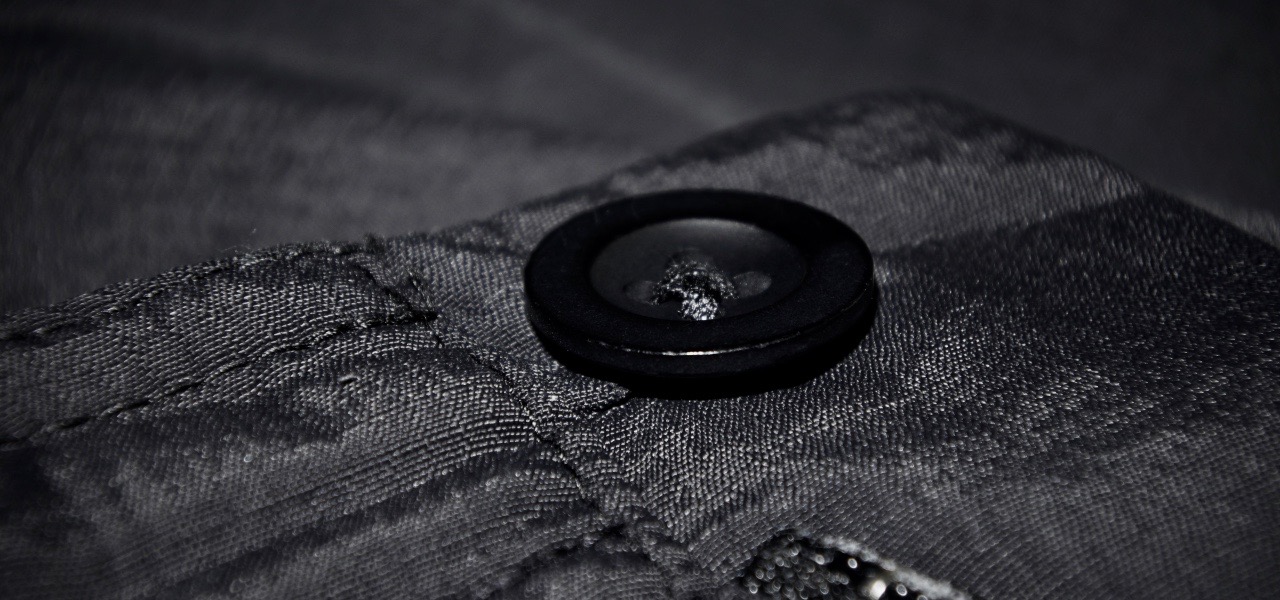
METAL HIGH-PROFILE BUTTON This particular pant comes with a high profile metal button. As the waistline of the pants takes on pressure, both sides of the zipper/ placket slightly pull against each other. This causes the button to twist, thus digging into your waistline. It’s an easy fix – carefully remove the metal button and replace with a 3/4″ button of choice. This will keep the waistline slim and allow it to lay nicely under a belt.

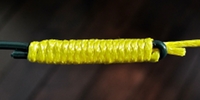
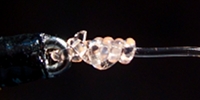
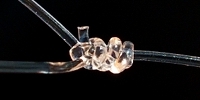
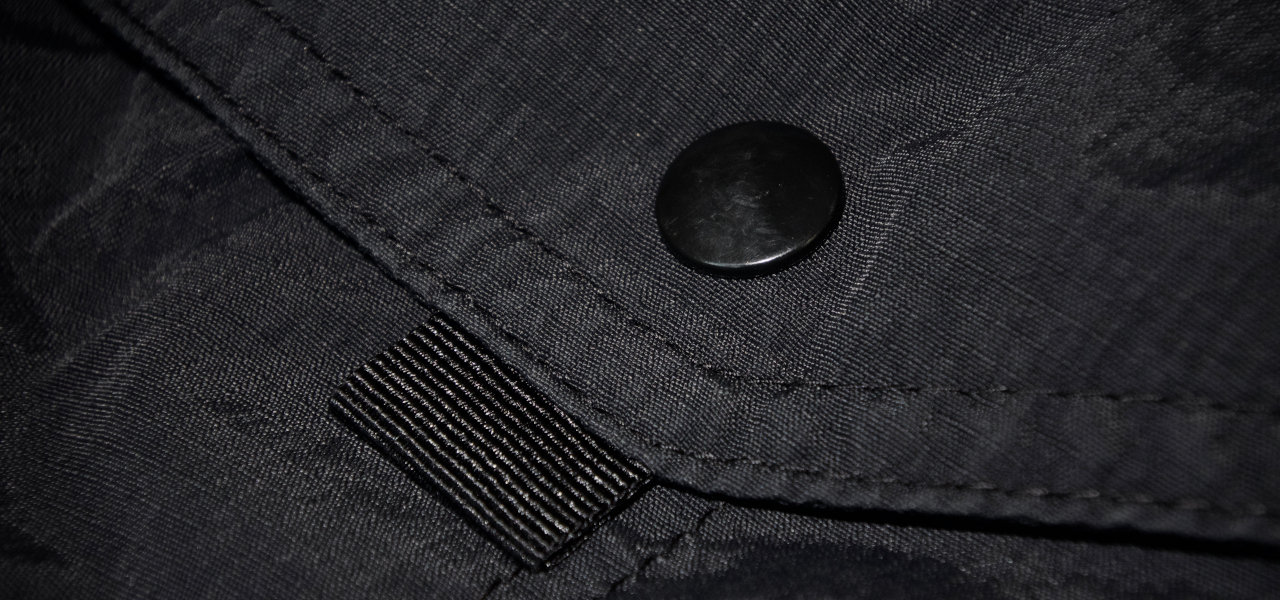
VELCRO FASTENING As most of us know, Velcro (hook-and-loop) fastening can be instrumental when securing gear quickly or in difficult environments. My only challenge comes when the hook-fastener shreds the material the loop-fastener is attached to. I will usually seam-rip (remove) the Velco and replace it with KAM snaps in some matching color. KAM snaps are made of polyoxymethylene (POM), are lightweight, and low profile. KAM snaps keep the surrounding material from deteriorating.

LIGHTLY STITCHED BACK POCKETS I found the stitching that secured both back pockets quickly wore away. I am sure siting on the boat, beach, rocks, benches, etc. had something to do with it. This is what pants are for, no? I reinforced my pockets with a slightly tougher thread.
[/column]

[column size=’1/3′]
Columbia Silver Ridge Convertible Nylon Pant:  Button Issue
Button Issue

Columbia Silver Ridge Convertible Nylon Pant:  Button Solution
Button Solution

Columbia Silver Ridge Convertible Nylon Pant:  Velcro Solution
Velcro Solution (KAM Snap)
[/column][/row]

OTHER NOTABLES

The elastic band is challenged if you carry any weight in the pockets or simply get the pants wet. I’m sure the stock belt functions fair enough, however I use Patagonia’s nylon friction belt . Had it for years and works amazingly well.

Just a reminder for everyone, nylon melts. Keep away from anything burning (i.e. a flame, sparks, embers, etc.). Nylon will easily melt and stick to anything it’s touching.

MSRP for this pant has always been $60 USD, however on occasion you may find it for less on Amazon .

I currently have four pair of these and absolutely love how functional they are across the board. A cool, lightweight, fast drying, easy-to-pack pant that offers sun/ bug protection to boot, how much better can it get?

If you have any questions or comments, please feel free to comment below and share.

Columbia’s Backcast Nylon Pant: 5-Star Performer


In South Florida, it can get pretty warm (90°F with 90% humidity) in the Summer months. One of the best ways to steer clear of the sun and stay cool is to wear a lightweight pair of UPF nylon pants. Many manufacturers (i.e. Patagonia, Simms, ExOfficio, etc.) offer UPF pants in polyester and nylon, however Columbia’s PFG Backcast Pant initially felt most comfortable and cool. One of the most appealing features of the pant is its super lightweight nylon. The pant also comes with a UPF rating of 50.

The Backcast nylon pant has an elastic waist band and poly draw-string for closure. I can’t say the small gauge draw-string could do much when the pants get wet, however I’m not going to wait and see. Great part of their design however is the fact they also come with belt loops. I always use a nylon Patagonia belt when out in the water. The belt not only works to keep wet pants up and secure, but also holds various fly-fishing tools (i.e. retractors, nippers, rag, etc.). This particular belt works nicely with the Backcast pant. In the beginning I had some discomfort, as the belt was pressing the draw-string into my hip bone. After I figured out the issue, I removed the draw-string indefinitely. If you want to try wearing the pants with a belt (without the drawstring), but think you may use the drawstring at a later time, here’s a tip: When pulling out the poly draw-string, tie a very thin nylon thread (sail thread) to it and pull it through. Secure the nylon thread to itself, so it won’t pull out when the pants are being used. This thread can be used to pull back in any other draw-string you wish to use at a later date.

Pockets are great as well! Both side pockets have wide openings. Columbia offers only one back pocket (right side) – this pocket has a zipper as seen in the image above. An additional vertical utility pocket is located adjacent to the right-hand pocket along the outside seam.

An inside poly mesh lining comes with this pant. The mesh is a huge contributor to drying out and keeping cool. When it comes to increased air flow or allowing sand to fall away, the mesh really adds to the pant’s functionality.

Surf Fishing

Light weight nylon pants work very well when in the surf. When fly-fishing in the surf, waves hitting your legs will often throw sand up into your shorts, making your walk home a little more uncomfortable. Great thing about wearing pants out in the surf is the fact you’re more protected.

Yak fishing

Columbia’s PFG Backcast Pant is perfect for kayaking, especially when your legs end up 90 degrees to the sun’s rays. Best you have boots, booties, or high-tops however, as the pants will come up a bit (exposing your ankles to the sun) when sitting/ paddling.

Colors & Sizes

Columbia’s PFG Backcast Pant comes in three colors: Fossil, Cypress, and Grill. In addition, the pants come in sizes ranging from Small to XX-Large with in-seams of 30, 32, and 34. For more information from Columbia, visit their PFG Backcast Pant web page.

Finding a Pair

Most fishing stores and retailers offering outdoor gear will have Columbia. West Marine and Bass Pro Shops will offer a sizable selection of Columbia gear. This particular pant is priced at $30 at most retailers and can be found on Amazon sometimes for $24!

Columbia also makes the PFG Backcast Pant in a “convertible” option. Meaning, you have the option to zip off the lower half of each leg to offer you instant shorts. Amazon also offers this convertible pant for a reasonable price.

If you have a great UPF pant solution – by all means, share it with us! Fly Mastery readers are always interested in improving their gear and its functionality…

Saltwater Fly-fishing Gear: Editor’s Choice


When it comes to purchasing fly-fishing gear (i.e. rods, reels, line, etc.), there are so many models and brands to choose from. Technology advances exponentially each year, bringing better and better equipment to the table. It is true my G3 Sage rod from 1990 still holds its own, however it seems like new rods have this extra sense of something – making them super sensitive, but yet more powerful. Reels have also evolved by leaps and bounds. Reels have become thinner in width and larger in circumference, giving better leverage on the retrieve. Designers have realized there is an excess of aluminum in reels and have since removed all but a skeleton structure to hold/ retrieve line. A byproduct of this creates great air flow around the spool, allowing the line to dry more quickly. Drag systems are now fully sealed, keeping sensitive drag components free of corrosion and grime. Exciting stuff really…

I get asked quite often what my “go-to rig” includes. As I answer most questions with a post, I figured I would add a little more than simply what gear I choose to fish. I have a Sage/ Galvan 3-weight for packing high altitude, a Sage/ Hardy 6-weight for all freshwater, and a Sage/ Galvan 9-weight for all Saltwater applications. As this post is focused on saltwater, I’ll continue with my 9-weight rig.

Before designing or choosing a rig, it’s important to focus on a target fishery or an environment and set of species to fish. One fly-fishing rig won’t do it all, but it’s possible to get one rig to cover a lot of ground. In my case, I wanted my first rig to handle Bonefish, Permit, Snook, Redfish, small Tarpon, Barracuda, and the occasional Jacks, Dolphin (Mahi), Shark, etc. As the 8-weight rods are built more for the Bonefish, Jacks, Sea Trout, small Snook, and small Reds, I stepped up in rod weight. As 10-weight rods are built more for Permit, Tarpon, Barracuda, and the like, I figured I would step down a bit. I felt like a 9-weight would handle a little of everything. Reels quite often are designed for multiple line-weights. I ultimately chose a reel that would work for 9 and 10-weight rods/ lines.

Rods

In 1990, I stopped using free/ borrowed stuff and purchased my first rod/ reel. I purchased a Sage 590-2 LL G3, a 5-weight Light Line Graphite rod perfect for Western river fishing. I broke a tip here are there and Sage always sent me a new one for $20. Needless to say, Sage not only has a nice product, but also a solid life-time warranty service. From the 1990s forward, G Loomis has always been a major player in manufacturing solid fly-rods. G Loomis (Gary) now lends any new technology improvements and innovation to Temple Fork Outfitters (TFO). TFO has the best bang-for-the-buck rod hands down. Their BVK rods always sits at the top of the lists in expert reviews.

I currently fish with a Sage One, 990-4. It’s relatively light weight, feels like it has a lighter swing-weight, and still seems to offer me the distance and control I want in a rod. Two other rods which interest me at this time are the TFO BVK 9-weight 4-piece and the G Loomis NRX 1089-4 G. Some friends and numerous experts in the field say great things about both rods. I haven’t been able to get out and use either of them, however they most likely would be a second and third choice at this time.

Reels

As mentioned earlier, in 1990, I stopped using free/ borrowed stuff and purchased my first rod/ reel. I purchased a Sage 505L (manufactured by Hardy), a 5-weight reel specifically designed for light line applications. I loved this click-pawl reel in so many ways. The reel worked flawlessly and was tough as nails. As Hardy manufactured the reel for Sage, I credit Hardy with the grade of materials and craftsmanship. I still appreciate Hardy reels and keep a close eye on the Ultralite SDS line. In 1999, I purchased a Galvan OB-1, a 3-weight reel I paired with a 3-weight 7′-0″ packing rod. I was so impressed with how the reel worked for me, I chose to stay with Galvan when purchasing my saltwater set-up. I did look at Lampson, Redington, Sage, Ross, Nautilus, Tibor, Einarsson, Hatch, Taylor, and others, however loved the minimalist design, air flow, functionality, and price point of the Galvan Torque series. I find it interesting how other reel manufacturers are now coming up with similar minimalist designs. More manufacturers are realizing you can keep a reel structurally sound and have it perform well with mush less material. Wright/ McGill and Taylor are now using much less material in their reels. Einarsson (manufactured in Iceland) looks like they are building a great product with much less material as well.

I currently fish with a Galvan T-10 and really like how it performs. Second and third choice reels for me would be the Einarsson Invictus 10 and Taylor Revolution 10, respectively. Both Galvan and Taylor reels offer a bang-for-the-buck value – Einarsson may be considered pricey by most.

Lines

Before purchasing my first saltwater fly-line, I wasn’t able to shoot as much of the heavy line as I wanted. I wanted more hands-on time – time to feel more of the line characteristics and differences before having to commit to purchasing one line. After debating lines made by Airflow, Rio, Scientific Anglers, Royal Wulff, Cortland, and others, I settled on Rio’s Bonefish Quickshooter. Considering advice from numerous expert sources, one common denominator emerged – to use a weight-forward (WF) line with no more than a 35′ tapered head. This puts more of the mass out in the air and gives someone new an easier start with heavier lines. Quite a few lines offer 40′ and 45′ heads, however only one or two manufacturers offered the shorter more compact head. Rio offered two colors in this line, Aqua-Blue/ Sand and a Orange/ Sand. When beginning to fish saltwater, it is nice to have a high-vis line – makes it very easy to identify in air and in the water. Keep in mind, if it’s easier for you to identify your line, it’s easier for fish to identify it as well. Now after some time out on the water and knowing how heavier lines behave in this environment, I think I could appreciate a stealthier line. In retrospect, the Aqua-Blue/ Sand color option looks more appealing now. Keep in mind some manufactures make completely clear fly-lines while others make simply clear heads. For the experienced, a clear fly-line would be the ticket.

I currently fish with Rio’s Bonefish Quickshooter WF9F in Orange/ Sand. As mentioned earlier, the bright head is nice, however I find myself using longer leaders to sneak up on fish in skinny water.

Leader/ Tippet

There are several schools of thought when strategizing on how to build leaders. Some swear monofilament should be used to build the majority of leader, leaving fluorocarbon for the tippet only. Some say it’s more important to pay close attention to the “size” of your leader material, stepping it down in sections to allow for better transfer of line energy. Well, after some trial and error, I tend to agree with the later. Some argue the mono is more forgiving (better movement) vs. the fluoro being too stiff. I think the aerodynamics and mass of the line play a more important role.

Whether you believe in a mono or fluoro leader, the goal is the same when stepping down in size to the tippet. I begin with the diameter size at the end of my fly-line and slowly step it down (in diameter and strength) from there. I start with a 2′ butt-section 50#, a few feet of 40#, a few feet of 30#, and a fluoro tippet of 20# (or 16#, or 12#), depending on you’re requirement or target fish. If two connecting sections of leader differ in diameter too greatly, you may get “line-stacking” when casting. In other words, your fly-line and some of your leader may cast nicely, leaving your tippet to stack up in a coil on the water. Graduating your leader sections based on diameter should be heavily considered.

I carry three bracelet-coils of Berkley, Vanish, Fluorocarbon, Clear (50#, 40#, 30#) for leader material and two smaller spools of 20# and 15# for tippet material. The tippet material is always carried in my waist-pack when on or off the boat. Oh yes, one other consideration – always carry at least three (3) ready-to-go tapered fluorocarbon leaders in your waist pack. It is inevitable you will be a mile from the boat (or car) when the coral rips your leader in two. Carry these as a contingency. I carry three Rio Saltwater Fluoroflex Tapered Leaders in my waist pack.

Summary

[list]
[list_item]Rod: Sage One 990-4[/list_item]
[list_item]Reel: Galvan T-10[/list_item]
[list_item]Fly-Line: Rio Bonefish Quickshooter WF9F[/list_item]
[list_item]Backing: PowerPro, Braided, White, 30#[/list_item]
[list_item]Leader: Berkley, Vanish, Fluorocarbon (50#, 40#, 30#)[/list_item]
[list_item]Tippet: Berkley, Vanish, Fluorocarbon (20#, 15#)[/list_item]
[/list]

Tell us about your saltwater “go-to” rig in the comment section below. Fly Mastery readers appreciate the outside perspective, especially when investing in similar gear…

Gear Up: Top 15 Tools for the Fly-Fishing Gear Bag


When heading out to fish minutes, miles, or days away, forgetting your gear bag would be catastrophic. For that matter, forgetting any single item may be catastrophic. Ever been in a remote location with straight blistering sun and forget your sunscreen? How about tucked into the Everglades, hours away from your car or the marina and forgot the bug spray. Try a full day of wading the flats without polarized sunglasses!

A solid bag of gear (tools) is essential for an effective and comfortable day of fly-fishing. Anticipating potential weather and environmental conditions plays a huge part in building your set of gear. Below is a list of gear I include in my bag no matter whether I drive or fly to my destination.

THE BAG

GEAR BAG – Start by assessing your current bag or backpack. Has it ever bounced to the back of the boat to then sit in bilge water? Has the sea spray soaked your bag at one time or another? Maybe the bag was simply left in the rain while you were out wading the flats. When assembling your gear, beginning with a waterproof (at least splashproof) bag should be a top priority. For some, making it a backpack may work better. I use my Patagonia Black Hole 30 liter pack for my fly-fishing gear bag. It’s not too big, not too small, it’s tough, and it’s almost waterproof. On occasion West Marine stores will carry this line. If you prefer the duffle bag option, check out the Patagonia lightweight Black Hole 30 liter duffel .

15 TOOLS

WAIST PACK – I’m a less-is-more kind of guy, so I use a Patagonia Stormfront Hip Pack when hopping off the skiff and wading the flats. This pack is waterproof, comfortable, roomy, easy to access, and functional. Of course, the pack is filled with alternate reel spools, boxes of applicable flies, three (3) tapered leaders, pliers, nippers, fishing license, lip balm, snacks, etc. Make sure you always have a small bottle of water in it as well.

ROD(S) – I strap my 4-piece rod tube to the gear bag, for transport.

REEL(S) – Make sure to include any extra reel spools or applicable lines for your trip.

LEADER MATERIAL – I typically carry bracelet spools of 50, 40, 30, 20 pound test in my gear bag. This gives me the option to adjust my leader sections accordingly. As noted above in my waist-pack, I will carry three (3) tapered leaders as a quick go-to solution if I end up losing my full leader for some reason – here you’re trying to avoid the long walk back to the boat to construct another hand-tied leader.

SUNSCREEN – In Southern Florida, don’t leave home without it. I carry a very small amount of sunscreen. I use Neutrogena’s oil-free SPF 110 because it’s small, potent, and feels dry after applying.

BUG JUICE – Having a can AND a pump (liquid) of bug juice is a good idea. I suggest using Repel Sportsmen Max Aerosol (40% Deet) as the main bug spray, however if running out is possible, bring a one ounce back-up pump of Repel 100 (98% Deet). For a super lightweight option when wading, I use the half ounce pump of Repel 100 .

BINOCULARS – I always bring my Leica 10×25 set of binoculars. They are not only used for sighting fish, but also for safety.

WIDE BRIM HAT – Many manufactures make quite a few solid wide brim hats. I use a Simms Solar Sombrero . Great light colors, bungee headband, removable straps, UPF 50+, etc. As light as this hat is, the internal bungee headband is perfect for keeping the hat on in higher winds. This hat can easily be folded and flattened, taking up almost no room in your bag.

SUN GLOVES – When you are out for most of the day, wear sun gloves. Some gloves come with stripping pads to help keep fly line from chaffing. I use Simms Solarflex SunGloves and love them.

NECK GAITER – All it takes is one day of sun on the water and you will never forget your gaiter/ bandana again. The sun’s reflection off the water will nail you. I use a Huk Trophy Fitted Full Face Gaiter . It definitely keeps you cool and is easy to breath through. To me it seems like the HUK gaiter doesn’t choke you as much as the other brands. After a full day of wading, it’s amazing how little sun my face will get. If you are looking to purchase one, remember to stay with neutral light colors.

WASHCLOTH & HAND TOWEL – Bringing both is important. I use one for cleaning and wiping things down. I use the hand towel for drying off.

RAIN GEAR – Always bring your rain gear, no matter how sunny it looks. You will get the occasional showers, however in Florida, the showers can easily bring a downpour having a serious volume of water. Keep in mind, being wet may not be a very big deal in the Summer months – being wet in the Winter months, or on a 40 MPH boat ride back to the marina can be pretty cold. I use Patagonia’s Torrentshell Jacket. It’s part of their H20no series and definitely keeps you dry. Patagonia’s Torrentshell Pant would complete the set. As both are lightweight and easy to pack, I use both for all my outdoor sports/ activities.

CAMERA – It is way too tricky to pull out a phone, or even a camera that is not prepared for the elements/ saltwater. If you want to capture your experience, use a GoPro. It’s made for the water (waterproof), it’s HD, it can take still photos, and it can be mounted or worn on your person. There is a variety of GoPro models. I have the GoPro Hero4 model.

WATER/ FOOD – Always make sure to include a few bottles of water. If you are out for the full day, make sure your dry bag has “at least” four 16 oz bottles. Remember, most people get dehydrated quicker in humid climates, as apposed to arid climates. Throw in a few munchies as well – you’ll be glad you did.

CELL PHONE – Within any reasonable distance of land or civilization, having a cell phone goes without saying. This is a tool used for safety, not to mention an insurance policy of sorts.

Your gear bag has so many important tools in it, I suggest you make this one of your carry-on bags if you choose to fly. You won’t have a fly-fishing trip at all if you check this bag and it gets lost.

OTHER CONSIDERATIONS (OUTSIDE THE BAG)

It is important to mention a few other items (which may not carried in your gear bag) that heavily impact the quality of time spent fly-fishing.

SUNGLASSES – A must-have would be polarized lenses. Polarized lenses allow you to easily see fish below the surface of the water. Bringing two pair is necessary, not only for mishaps and safety reasons, but an amber set usually helps on overcast days. Ideally, a grey and amber set make a good tag team. I currently use Maui Jim’s Haleakala model for sunny days. The wrap-around style, grey Maui Jim optics, and polarization makes a great combo. I also chose this model because of its wire nose bridge – it keeps air flowing and allows for better cooling. Note: You can special order the matte black frame with the grey lenses through any Maui Jim retailer, as I did. This combination is not available in their standard line.

SUN-SHIRT – As I’m a guy who minimizes the mess of sunscreen, I prefer staying covered up when out in the sun. Pelagic’s Vaportek line of UPF 50+ long sleeve sun protection is my go-to shirt. It’s cool in the baking sun, it dries very fast, and is smooth to the touch. This material is great for keeping cool in the heat, however be careful, it snags quite easily. On occasion, I’ll also use light nylon sun-shirts to stay cool and prevent sun exposure. My go-to shirt in the “loose-fitting” category is the Columbia’s Bahama II Long Sleeve Shirt. These are great for staying cool, air-drying quickly, and sun protection (UPF 30+). They also offer a nice windbreak when quickly running to the next hotspot at 40 MPH. Remember to stick with light neutral colors (not white – can spook the fish).

WADING PANTS – Never thought I would ever wear a pair of pants in the water. After taking a closer look at some of the newer lighter materials and how the pants are constructed, I gave them a try. Wearing a pair of these light nylon pants for a full day of kayak fly-fishing really sold me. I use Columbia’s Silver Ridge Convertible Pant. They’re super compact for travel, they’re light, they dry fast, and somehow keep you cool in the hottest part of the day. The convertible feature is always a nice option of course.

WADING SHOES – On the skiff, you may find yourself barefoot or in socks. When jumping into the water to wade flats, you may want to consider protecting your feet. It really depends on your environment. Consider stingrays, coral, sea urchins, etc. In the beginning, I used micro thin neoprene socks and a cheap pair of Canvas All-Star high-tops to wade. Great idea, however cleaning the gear when returning home became cumbersome. Not to mention, garments made of organic materials will house bacteria – better to stick with nylon and other poly materials. I now use Merrell’s Capra Rapid Hiking Water Shoe. I have found this shoe is light, quick drying, and stays cool in our warm water. As expected, Merrell’s sole is also non-marking – boat decks will stay nice and white.

MARINE RADIO – Having a VHF marine radio on hand is another insurance policy. Like we would use a cell phone when close to civilization to reach others for help, a VHF marine radio would be used to find help in locations where only other boats are close by. I use an Icom M73 Handheld. It’s small, offers 6 Watts of power, has an IPX8 waterproof rating, and has some great features. I have used Icom for over 30 years now and have been satisfied with their products from day one.

If you have any suggestions for additional gear/ tools, we want to know about them. Please feel free to comment below and share.

Sun Hats: Simms’ Solar Sombrero

WIDE BRIMMED UPF SUN HATS

Over this last year, I’ve been in the market for a sun-hat. As typically done when looking for new gear, I start my research with on-line reviews and trips to local shops for a little hands-on assessment. Problem is, playing with it in the local fly-fishing shop isn’t going demonstrate much.

The challenge is finding a hat which fully protects you from the sun, keeps you cool, is offered in reasonable colors, is secure in high winds, stays intact after multiple washings, can fold up in the gear bag, and doesn’t look lame when wearing it.

After looking at more than eight of the most functional fly-fishing sun-hats available by many of the top manufacturers in the UPF garment industry, I settled on the Simms Solar Sombrero. For comparison purposes, this hat falls into the “floppy wide brim UPF packable” class of hats. Below are a few highlights on the hat’s functionality after several months of environmental impact.

Sun Protection – The hat truly offers a full 3″ brim. For intents and purposes, the brim sits completely horizontal, offing maximum shade from vertical sun.

Keeps You Cool – The hat is constructed from 100% super-light nylon – it has a very soft and airy nylon feel. Not sure how the top vents, but I stay cool through the hottest part of the day. The super-light nylon upper is nice, especially when I use the upper portion of my sun-hat to store the knot when tying/ securing my Coolibar UPF 50+ Bandana.

Offered in Reasonable Colors – At this time, the Solar Sombrero is offered in Light Grey, Gunmetal, and Tan. For comparison purposes, others may call these Taupe, Putty, and Beige. All colors are light and neutral and coordinate with other major manufacturers of UPF clothing (i.e. Columbia, Patagonia, ExOfficio, Under Armour, etc.). A nice feature on the hat is the black underside of the brim. This dark underside cuts down on additional glare reflecting from the surface of the water.

Secure in High Winds – Still amazed with how this hat holds on in high winds. Simms has built in several ways to secure this hat when worn. A soft elastic band will lightly secure the hat. For higher winds, an additional small gauge integrated bungee can be tightened to provide reasonable holding power. Simms does provide a well made chin-strap/ cord for those who prefer its functionality. If removing this strap/ cord is important (as I typically do), Simms made it very easy to remove. I use a different sort of leash all together.

Wearability – After researching quite a few UPF garments over the last year, I have noticed a common disclosure in the fine print on many manufacture’s tags. The UPF rating is often guaranteed for the life of the garment. Question is, who really defines the “life of the garment”? Most garment tags now state the garment life is defined as 35 washings, or so. We know the garment will last longer – manufacturers are only guaranteeing the UPF rating for up to a specified amount of washings. Remember, in most cases the UPF barrier is applied to the material, not necessarily inherent to the material.

Packability/ Collapsability – For those who love to ravel, having a hat which collapses or folds into tight spaces can be nice. This hat will not only pack completely flat, but will also fold up when needed. I like to keep the super-light foam brim flat – I feel it better maintains the integrity of the hat.

Design – So many hats on the market fluff up in the wind, are too flimsy, are too stiff, or simply look lame. Finding a hat with a progressive look and a design enhanced by its functionality was an added value. After using it for several months, I still find it is the best looking sun protection out there.

Cost – Last but not least, the Solar Sombrero comes in at under $30. If a fly-shop is charging more than $30, they are gouging. Many on-line resources will have what you’re looking for and reasonably priced.

If you have a favorite “floppy wide brim UPF packable” hat perfect for fly-fishing, please share! We all are looking for various functionality in hats – sharing your solutions make Fly Mastery better for all of us.

Fly-Fishing Knots: Rigging Your Rod & Reel


Many resources are available on the net these days, all advising which knots are best for rigging a fly-line and leader. A majority of these knots have a similar breaking strength, especially when you look at all the loose variables in tying them. For example, how many wraps were used, are the adjoining lines similar in size, is one line monofilament and the other fluorocarbon, etc. If a super strong knot is used for tying the wrong materials together, the knot won’t live up to it’s tested breaking strength.

Keep in mind, some knots are easier to tie in the elements (i.e. darkness, cold temperatures, high wind, etc.). One main goal in my post today is to give readers a sense of peace when it comes to choosing what knots work best when rigging fly-lines and leaders. Choose strong, easy-to-tie, and low profile knots in the beginning may be your best bet. If you are after monster fish, well, seek professional guides who specialize in landing trophy fish. Ask for “fish specific” advice on the best knot for your application.

[row][column size=’2/3′]

Reel Spool & Backing

Let’s start with securing your fly-line backing to the reel. Simply said, best way to secure backing to your spool is to use an Arbor knot. This is unanimous advice in almost every book and every resource on the net. Good practices include making several wraps around the spool before securing the knot. This will more evenly distribute the pressure if by chance you ever end up losing all your line to a fish.

Backing to Fly-Line

Knots will differ slightly based on how your fly-line is terminated. Quite a few of the new fly-lines today come from the manufacturer with a welded loop on each end. If you haven’t fly-fished in the last few years, this welded loop will be a new feature.

With Welded Loops – You will need to tie a loop for the adjoining end of your backing – this will be secured loop-to-loop with your fly-line. It is advised to tie the adjoining loop large enough to pass a fly-line spool clean through the loop, say maybe a loop eight inches (8″) in length. This larger loop makes it easier to swap out fly-lines when necessary. Loops most often tied in backing for this purpose are the Surgeon’s Loop, or the Bimini Twist. The Surgeon’s Loop is simple and for quick applications is tied most often. Use at least three (3) wraps to make secure and remember to tie an eight inch (8″) loop. The Bimini Twist is tied much more easily with two people, however can be tied by one person with a little practice. This is the strongest loop – it’s breaking strength is rated the highest of all loop knots.

Without Welded Loops – Traditionally, the Nail knot was used for tying backing to fly-lines. It is a low profile knot and is typically used for greater strength with dissimilar line diameters. For some time now, a more popular knot used for securing backing to fly-line is the Albright knot. It also is used for securing to lines of dissimilar diameters. More fly-fishing experts seem to use the Albright knot more than any other.

Fly-Line to Leader

Here as well, knots will differ slightly based on how your fly-line is terminated. Below are solutions for lines with welded loops and some for lines without welded loops. Some experts say to get fly-lines to transfer energy from fly-line to leader more efficiently, using heavier monofilament is better for the base portion of your leader. Evidently, monofilament is advised for its flexibility and larger gauge. There are positive arguments for using fluorocarbon, however they don’t seem as convincing.

With Welded Loops – You will need to tie a loop for the base of your leader – this will be secured loop-to-loop with your fly-line. The loop is used for easily swapping out leaders when necessary. Loops most often tied in leaders are the Surgeon’s Loop, or the Perfection Loop. RIO (a major supplier of high quality fly lines and leaders) supplies their tapered leaders with hand tied Perfection Loops. This might suggest a Perfection Loop is a solid way to go. I also prefer the Perfection Loop – it is extremely fast and easy to tie.

Without Welded Loops – Traditionally, the Nail knot is renown for tying the base portion of the leader to fly-lines. It is a low profile knot and is typically used for greater strength with dissimilar line diameters. As an old-school guy, I’ve always liked the look of a good Nail knot and feel like it moves through the guides a little easier, especially if you lube it with a little Chapstick. Typically this base portion of the leader is 40 or 50 pound monofilament (for saltwater applications) and should be at least two (2) feet long. The end of this base portion of leader can be terminated with a Surgeon’s Loop or Perfection Loop – it will allow for quickly swapping out leaders when fishing conditions so demand. If you are going to use a Surgeon’s Loop, make at least two (2) full wraps when using larger gauge monofilament.

Leader to Leader (tippet)

As you move past the base or butt section of monofilament leader, it would be advised to use fluorocarbon for the remaining leader and tippet. Fluorocarbon is not only thinner than monofilament, but is harder and somewhat stiffer. When stepping down portions of leader to meet your tippet, there are two knots that seem most popular, specifically the Surgeon’s knot and the Blood knot. Many find the Surgeon’s knot easy to tie. A small drawback to this knot is how square it can be. If you have smaller diameter line, use at least four (4) wraps. If you have larger diameter line, use at least two (2) full wraps. The Blood knot is my knot of choice. It not only has a reasonable profile (slips through guides nicely), but is very strong. Believe it or not, you can tie Blood knots very quickly.

Tippet to Fly

Many knots exist for securing flies to tippets. In freshwater fly-fishing, or when you need a fly to specifically behave as one with the line, an Improved Clinch knot is still used most often. In saltwater however, flies are fished below the surface and should move independent from the line. In this case, an open loop secures the fly to the line or tippet. This allows for more natural movement of the baitfish, shrimp, crab, etc. An endless amount of loop knots exist, however three of the most popular include the Non-Slip Mono, Perfection Loop, and Surgeon’s Loop. I use the perfection Loop as it is very quick to tie and is rated one of the highest for breaking strength. Remember to tie your loop relatively small. A good rule of thumb is to make your loop less than one quarter the length of your fly.

One last tip: If you are one to tie your own leaders like most other fly fishing experts, always carry some tapered leaders for contingency. If for some reason you have run out of leader or tippet material, having a quick and easy tapered leader ready to go is huge, especially if you are a good distance away from the boat, marina, or your lodge.

Questions or comments? Please feel free to comment/ reply to this post below – We will be glad to offer any additional advice.
[/column]

[column size=’1/3′]

Arbor Knot
Arbor Knot

Welded Loop
Welded Loop

Surgeon's Loop Knot with Backing
Surgeon’s Loop Knot

Bimini Twist
Bimini Twist

Albright Knot with Backing
Albright Knot

Surgeon's Loop Knot with Monofilament
Surgeon’s Loop Knot

Perfection Loop Knot with Monofilament
Perfection Loop Knot

Nail Knot
Nail Knot

Surgeon's Knot with Monofilament
Surgeon’s Knot

Blood Knot
Blood Knot

Improved Clinch Knot

Non-Slip Mono Loop Knot with Monofilament
Non-Slip Mono Loop Knot
[/column][/row]

Simms’ Stone Cold LS Shirts


A few weeks ago, I picked up one of these Stone Cold LS Shirts from Simms . The store owner suggested I try it on and get a feel for how cool the shirts feels. To my surprise, the material really felt cool. I’m not really sure whether it’s the weave or material thickness which makes it so cool.

I ended up purchasing the shirt a half size larger than I would typically, only to leave room for an under-layer if needed. I do like to have shirts fit loosely, especially in warmer weather when an under-layer is not needed.

Over the last ten years or so, there has been a popular trend of fishing shirts getting “over pocketed”. I would find two main chest pockets having four pockets stacked on top of each other! Of course, these pockets would consist of boxed pockets, mesh pockets, velcro pockets, zipped pockets, and “half” pockets. You could never really figure out how to get in to any of them. The beautiful part of the Simms Stone Cold LS Shirt is the fact it only has two chest pockets, tucked under a aesthetic/ weather hem. The pockets include zipper enclosures and lanyards.

If you are in the market for a warm weather sun/ fishing shirt, try one of these Stone Cold shirts on and feel the difference.

[row][column size=’1/2′]

Description

Teeming with Cool Control™ fabric tech, Simms’ Stone Cold LS Shirt delivers Arctic-inspired relief during simmering days on the water. Recycled jade crushed into a fine powder and implanted into the yarn powers this cool-to-the-touch fabric. The result is a sustainable, stylish, temperature-regulating piece, with the added benefits of anti-odor, wicking, and quick-dry performance. Additional features include fly box compatible, zippered chest pockets, extended Sun Cuffs for prime sun protection, and the added comfort of a straight hem and smooth off-shoulder seams.[/column]

[column size=’1/2′]

Simms' Stone Cold LS Shirts
[/column][/row]

Features

[list]
[list_item]Cool Control™ fabric technology absorbs & dissipates heat & provides a cooler, more comfortable garment[/list_item]
[list_item]Two fly box compatible, zippered chest pockets[/list_item]
[list_item]Under collar buttons, straight hem & off-shoulder seams for added comfort[/list_item]
[list_item]Extended Sun Cuff for additional protection[/list_item]
[list_item]Winner Gray’s Sporting Journal’s Best 2013[/list_item]
[/list]

[list]
[list_item]FABRIC TECH:   50% Nylon/ 50% Polyester with Cool Control™ fabric technology[/list_item]
[list_item]APPROX. WEIGHT:   6.5 oz[/list_item]
[list_item]STYLE FIT:   Traditional Fit[/list_item]
[list_item]SIZES:   S – 2XL[/list_item]
[list_item]COLLECTION:   Guide Series[/list_item]
[/list]