Easter Baskets & Bunnies


Bunny flies are a necessity in almost every saltwater fly box. Rabbit fur takes most of the credit for the success of the Bunny fly – the soft fur offers some amazing action in the water. Bunnies are typically made by wrapping the main body (hook shank) with “rabbit strips” in a fashion similar to the way a tennis racket grip is wrapped. As the rabbit strip wraps up the hook shank, it should overlap slightly. This overlapping gives the fly a nice bulk of rabbit fur as the body transitions into the head. In a way, the fly takes on the shape of a typically bunny nose.

The tail of a bunny fly can be made of a single rabbit strip, various feather, buck tail, or other material of choice. Adding a few strips of crystal-flash really makes for an effective fly.

The bunny fly is used to catch a variety of species (e.g. Striped Bass, Tarpon, Snook, Redfish, Sea Trout, Barracuda, and too many more to mention).

Some hot colors tried-and-true include Red/ White, Beige/ Cream, and Black/ Purple. Bright colors are effective as well.

If you are interested in picking up a few different colors of Rabbit Strips, check Amazon for bundles and combo packs. As time moves forward the options become more plentiful less expensive.

As we are approaching Easter 2015, our post on Bunnies is timely – figured we would have some fun for the occasion. For more information on tying or fishing bunnies, by all means comment below. If you would like to have Fly Mastery publish a creative bunny fly you have tied, send us one! We will post your fly recipe and send you the high-res pic.

Happer Easter !

Fly-Tying Classes


Come spend some time with Fly Mastery and tie some creative fly patterns for your next fly-fishing trip! Our classes set aside time for learning new techniques, sharing design creativity, and telling fish stories over a good cup of coffee. We welcome kids of all ages and would gladly bring class to a local venue, if need be. Come join Fly Mastery for some shop-talk on:

[list]
[list_item]Fly-Tying Tools[/list_item]
[list_item]Fly-Tying Materials[/list_item]
[list_item]Designing Effective Flies[/list_item]
[list_item]Improving Fly-Tying Techniques[/list_item]
[/list]

Fly Mastery classes are offered to help improve fly-tying talent, inspire fly-tying enthusiasts, and create a social environment for all to share in our similar passion of fly-fishing. Fly-tying classes offer much more. Many of the fly-tying materials come in large packages or sizable qualities. Quite often, attendees will trade portions of their material to grow their own color selections or texture options. It’s a great way to improve the fly-tying options when home at your bench.

Locations

Fly Mastery class locations will vary, all depending on available venues and where attendees are located. At this time, classes are being held in Fort Lauderdale and Plantation on a regular basis. Specific locations are announced a week prior to class.

Days

We hold two fly-tying classes each month (typically Saturday mornings) and only when two or more have committed.

Times

We start at 10.00am. Class will usually last for two hours. Most will hang out for another hour or two, tying flies, sharing stories, etc.

Fees

Saturday classes are complimentary. Private fly-tying lessons are offered for $20 an hour.

What To Bring

All attendees should have a vise and set of tools (i.e. scissors, bobbin, head cement and at least a few toothpicks). If an attendee is short on materials, Fly Mastery will be happy to get you going with our materials. For Saturday sessions, we suggest bringing a lunch or snack. Most of us hang out through the lunch hour.

Prior to coming to class, check out two posts written to jump-start folks who are new to fly-tying. See Fly-Tying Tools: Where Do You Start? and Fly-Tying Materials: Where Do You Start?. Both will give you a good sense of what’s involved with fly-tying.

For more info or to reserve a spot in one of our next classes, e-mail us.

Come share the fly-tying bench with Fly Mastery!

Flies by Joe Murray


I first connected with Joe Murray over Twitter earlier this month. After exchanging a few fly-tying ideas, he shared with me an image of a unique baitfish fly he tied recently. Joe indicated the baitfish design was an original concept and very effective in South Florida. Fascinated with the fly’s design concept, I requested he send me a few to showcase on Fly Mastery. Joe was kind enough to send me a few additional designs as well. Some examples include:

  • Murray’s Beach Snook Streamer: White
  • Murray’s Backcountry Baitfish: Chartreuse
  • Mangrove Bunny: Chartreuse & Olive
  • Root Beer Gurgler
  • Murray’s Backcountry Baitfish: Chartreuse & Blue
  • Murray’s Backcountry Baitfish: Grey

Joe ties most saltwater patterns and would be willing to sell a few by request. If interested in purchasing any of the referenced flies, pricing is included below.

Pricing

Gurglers are $1.50
Back Country Bait Fish are $2.00
Mangrove Bunnies are $2.00

Other Details

Joe ties all of his saltwater flies with Mustad hooks. If looking for something special, please make sure to inquire first. He will ship any assortment needed.

Shipping

All quantities of 20 flies or less, ship for $3.00 (USPS First Class)
All quantities of 21 flies or more, ship for $5.00 (USPS Flat-Rate 3 day)

Orders typically ship inside of one week. For specific questions, feel free to connect with Joe via Twitter or e-mail.

Joe’s Bio

Joe grew up walking the many tributaries of Lake Erie fishing for Smallmouth Bass, Carp, and Steelhead. Summer vacations would take him to Nags Head, NC where he would walk the beaches spotting schools of Blues making their run toward schools of bait fish. It was during this time he transitioned over to fly fishing exclusively. A career as a school teacher has allowed for extended Summer stays in Fort Meyers, Marco Island, Sanibel Island, and Key West. Locations like this gave him the opportunity to wade flats and kayak the Backcountry for Snook, Redfish, and one of his favorites, Tarpon. This past Summer he landed his first Tarpon from the kayak using one of his latest creations. He continues to fly-fish the Backcountry of the Everglades and crystal clear waters of the lower Keys to feed his addiction – getting Tarpon to eat! Joe is currently sharing his love for fly-fishing by pioneering a fly-fishing club at the school in which he teaches. His motto is: You will always have a friend on the water.

Southern Boys Flies


Pete Colding of Southern Boys Flies was advertising “flies made to order” just the other day. Not only did his line of flies show some creativity, but his pricing was the most competitive I’ve seen. In an effort to show some of this creativity with our readers, I requested he send us a few flies to share. Some examples include:

  • Nail Biter
  • Black Puff
  • Olive Drab Crab
  • Southern Toad
  • Bugger Buddy in Olive

Pete will tie just about any saltwater pattern possible. Popular sellers are crabs, Clousers, toads, Tarpon patterns, Shad, Crappie jigs, Teasers, etc.

Pricing

All Clousers are $1.50
Deceivers, Whistlers, Sea Ducers, Bunnies, and toads are $2.00
All crabs and Half’n Halfs are $2.50
EP fiber flies are $3.00

Other Details

Pete ties all of his saltwater flies with Mustad Stainless Steel hooks. He will ship any assortment needed. All orders over $20.00 are shipped in a foam box. All orders over $50.00 will be shipped Flat-Rate Priority mail FREE (typically 2-day delivery). Orders typically ship inside of one week. For specific questions, feel free to connect with Pete via Facebook or e-mail.

Pete’s Bio

Pete’s love for fly-fishing started in the early 1980s. For some time, Rhode Island ponds, back bays, and beaches were his stomping grounds for trout and Striped Bass. In fact, he fly-fished Rhode Island coastal waters for over 20 years. His quest for new species on fly yielded Bonito and False Albacore for a few years running. Pete later moved to North Carolina and fished the Roanoke for Shad and Striped Bass. Travels to Alaska have included fishing Montana Creek all the way to Homer, landing abundant Sockeye and Silver Salmon, Halibut, and Ling Cod. Pete spent some time fishing New River in Virginia for enormous volumes of Small Mouth Bass. His passion for fly-fishing and years of experience is evident in his fly-tying creativity.

Whip-Finishing: Final Steps in Tying a Fly


Finishing a fly can be done a number of ways. I’d like to share two of the most popular ways to finish a fly and demonstrate one of them with video. Before reaching the point of finishing a fly, make any additional thread wraps to shape the head of the fly. Shaping is key – many flies need to be shaped to better match the intended bait. For example, use a longer and consistent set of threads to simulate the nose of a squid, a longer and narrower angle for Clousers, and so on.

At this point, it’s time to tie off your thread. One popular way to snug up the tail end of your thread is to make a series of half-hitches. If half hitches are preferred, make at least three (3) of them and finish with a good amount of head cement. If you prefer whip-finishing (as most of us do), whip-finish twice, using five (5) wraps each time.

Keep in mind, whip-finishing by hand is easy enough. You may find a whip-finishing tool is not necessary. Above is a video demonstrating how whip finishing technically secures your thread. I’ve used larger format materials to help show what is actually taking place during the process. After following along with the mechanics of whip-finishing, the whole process becomes much easier to understand and practice.

Questions or comments? Please feel free to comment/ reply to this post below – We will be glad to offer any additional advice.

Less Is More: Great Fly Patterns Can Be So Simple


Many new to fly-tying may find the creativity side of tying flies somewhat overwhelming. Not to fear, some of the best and most effective flies simply consist of a small collection of hairs tied to a hook shank in the right place.

It is important to remember fish can be finicky when eating. They can also work themselves up in a frenzy, eating everything in their path and immediately. As most of you have seen before, fish react in a fight or flight split second. Tying a fly that vaguely resembles an insect, shrimp, or crab is all it takes to get a hungry fish to commit. This is especially the case when your fly will shortly be stripped out of their comfortable and accessible eating zone.

The featured image above is an example of how simple or elementary fly construction can be. Securing a set of bead-chain eyes and some bucktail will make a fly like this complete. I like to add a few strands of crystal flash while I’m at it – let your creativity run wild.

For additional examples of simple flies to tie, see my post on Bendbacks.

Orvis Fly Tying Guide, Tom Rosenbauer


If you are looking for a comprehensive book on tying flies, you found it! The Orvis Fly-Tying Guide includes detailed steps from start to finish on how to tie flies for all the basic patterns. Fresh and saltwater flies are covered, beginning and advanced techniques are covered, and detailed photography of each step of the fly tying process is included. The book lays the basic ground work by explaining simple tying techniques and then progressing with detailed tying instructions for some of the most popular and modern patterns. How to choose and prepare the correct material and all necessary tying steps for each fly are detailed in beautiful large color photographs.

[row][column size=’2/3′]
Once you have practiced basic tying techniques, the book includes photographs of endless fly patterns to inspire your future designs. All 400+ patterns include their fly tying recipes and proportions to help recreate them. Endless colors and fly patterns will get you thinking out-of-the-box on what materials to include in your next fly. This of course will get you “jonesing” to hit your closest fly tying shop to pick up the next batch of materials for your fly tying bench. Believe me, I know how it works…

For those interested in how much of the book is dedicated to saltwater – about one third addresses saltwater fly tying and fly patterns. Again, techniques and instructions may be demonstrated on freshwater flies, however most is applicable to saltwater flies.

Enjoy![/column]

[column size=’1/3′]

Orvis Fly-Tying Guide
[/column][/row]

Fly Tying Materials: Where Do You Start?


It is a bit overwhelming, standing in the fly shop and looking at the walls covered in fly tying materials with endless colors. Where do you start? As someone who just recently experienced this, I want to share my solutions and offer a way to make sense of it all.

Before jumping into what materials to purchase, it is important to focus on a fishery and/ or targeted fish. In this case, we are going to focus on salt water flies used for Bonefish, Permit, Tarpon, Snook, and Redfish – all in South Florida.

Let’s talk materials…basic materials. If you only purchased a few materials/ colors, the following suggestions will give you a running head start.

HOOKS: In the beginning, start with a standard length and standard strength fly tying hook. Anything equivalent to Mustad 34007 will be fine. Don’t worry about the finish or coating of the hook at this time. Later, if you wish to only fish with stainless or tin coated hooks, many are available to choose from. For our targeted fish above, sizes 2, 4, 6, and 8 will be of interest. For those just starting to tie salt water flies, start tying with larger hooks first. In this case, use some #2 hooks initially.

THREAD: Many types of thread are available and are made from several different materials. To get started, larger gauge thread will be easier to use, but not necessarily produce intricate flies/ designs. Picking a gauge in the middle will work well for several reasons. I suggest using anything equivalent to UTC 210. For our targeted fish, your first five colors of thread should include white, tan, fluorescent chartreuse, fluorescent shell pink, and fluorescent red. If you reached for a second set of colors, grab burnt orange, rusty brown, black, fluorescent pink, and fluorescent fire orange. Having this color set gives you endless combinations of fly designs applicable for patterns used on the above fish. If you wish to take things one step further in creativity, pick up some UTC fluorescent pink vinyl-rib (medium), UTC silver/ gold holographic tinsel (medium), and UTC clear mono-filament (.006).

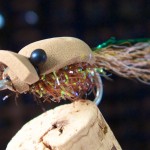
EYES (weight): Having the ability to add different amounts of weight to flies gives your flies the ability to sink at different rates. Light weight flies are used in shallow water (skinny water) and heavier flies in deeper water. To initially build your stack of materials, pick up some silver and gold Bead-Chain eyes (large) and some nickel and gold Brass Eyes (medium). Initially, this will offer some options for your larger sized hooks. Eventually, if you begin tying smaller flies, step down a size in both Bead-Chain and Brass Eyes. The smaller size will work nicely for the smaller sized hooks.

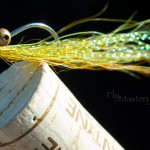
BODY MATERIAL (sparkle braid): Flat Diamond Braid or sparkle braid is a great option for quickly wrapping the shank of a hook to build up a reflective body, similar to those found on many Gotcha flies. A good suggestion would be to pick up sparkle braid in cream, pearl, and peach/ pearl.

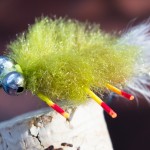
BODY MATERIAL (dubbing): Dubbing a fly really gives a fly some girth and fuzz, taking authenticity up a notch. See some pics in our posts titled Flaming Shrimp, Sandy Shrimp, and Dubbed Shrimp for examples of what dubbing can do for a fly. Some initial dubbing colors we suggest you purchase would include shrimp pink, pale pink, flame, and tan. Maybe find some dubbing which incorporates UV flash. It will offer that subtle flash of blue and purple.

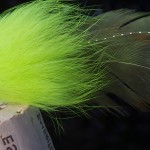
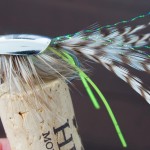
WING MATERIAL (buck/calftail): If there was a staple material in fly tying, it would have to be bucktail or calftail. Keeping this simple, best thing to do is pick up a sample pack of multiple colors. The idea is to stay with bright colors initially – I suggest fluorescent bucktail. If you wish to pick up a second set of colors, get another sample pack with standard colored bucktail including white, cream, taupe, brown, olive, and black.

WING/ TAIL/ ANTENNAE MATERIAL (crystal flash): In fly tying, crystal flash may be considered the most magic ingredient or material of all. Back in the day when materials were all natural, it was so difficult to get that “fish scale” flash in flies. crystal flash brings multicolored fish scale flash to your flies. This material is a must-have for any salt water fly tying bench. Initially, I would suggest purchasing colors including olive/ pearl, fluorescent shrimp pink, UV pearl, rainbow/ pearl, and black pearl. If you reached for a second set of colors, grab silver, gold, copper, black/ red, and “mirror”.

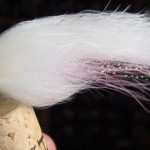
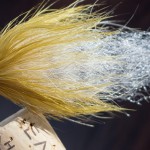
BODY/ TAIL MATERIAL (Marabou): Marabou will be important for fluffy tails among other things. Suggested colors to purchase would include white, fluorescent orange, and anything resembling taupe. Here’s a look at “banded” Marabou – great for shrimp flies!

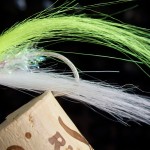
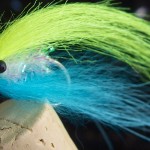
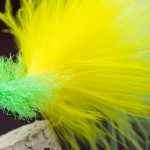
WING/ BODY MATERIAL (EP fibers): This synthetic EP fiber is the best material for making so many salt water flies. EP fiber can be used for wing, body, and tail material. Depending on how you tie EP fiber, a fly can take on unimaginable shapes. It doesn’t take too much of the EP fiber to complete a fly either. Your fist five colors should include white, pale olive minnow, pink, chartreuse, and orange. This will get you tying shrimp, crabs, deceivers, clousers, and many other salt water patterns out of the gate.

SILICONE LEGS: In an effort to keep things simple, having standard sized rubber legs in orange, pink, root beer, or clear offer you a great selection for beginning to incorporate legs into flies. Great thing about clear legs, you are able to color them with permanent markers to give you the color pattern of choice. Make sure the rubber legs you purchase have black specs (peppered) or some barring, as this offers a more realistic set of crab or shrimp legs.

WEED GUARD MATERIAL: Flies used in areas with turtle grass or other forms of sea grass will need a weed guard. Tying in a weed guard is simple. Purchase some 30 pound monofilament (clear). You shouldn’t need more than a 20 yard spool for now.

PERMANENT MARKERS: Don’t underestimate what a Sharpie can do to a fly. Sharpies in multiple colors give unlimited options for custom coloring rubber legs, body material, and touching up body thread exposed in awkward areas. Sharpie offers a mini variety pack which has worked very well for me. I use a few of their fluorescent colors too.

A few things to remember:

1) Take advantage of digital media for examples and tying tips (i.e. videos, step-by-step photos, specs/ recipes, etc.)
2) Less is more. Tie flies with less material than expected.
3) Keep it simple, especially in the beginning. Flies are created in layers, one layer at a time.

The information above should offer some insight prior to purchasing your initial set of fly tying materials. Questions or comments? Please feel free to reply to this post below – We will be glad to offer additional advice or information specific to your needs.

See related post titled Fly Tying Tools: Where Do You Start? for suggested tools to get you started tying flies today.

Fly-Tying Tools: Where Do You Start?


Yes, we all felt the same thing when debating how to get started in fly-tying. Standing in the fly shop and looking at the walls covered in fly-tying materials can be a bit overwhelming. Where do you start? As someone who just recently experienced this, I want to share my solutions and offer a way to make sense of it all.

Let’s start with unanimous tips from almost every fly-tying professional…

1) The better the fly-tying tools, the easier it is to tie flies.
2) The better the fly-tying tools, the more potential you have to tie better flies.
3) Buy the best quality tools and material you can afford; this does not mean the most expensive.

The above tips are dead on. I would like to offer a few more:

4) Take advantage of digital media (i.e. videos, step-by-step photos, specs/ recipes, etc.)
5) Less is more. Tie flies with less material than expected.
6) Keep it simple, especially in the beginning. Flies are created in layers – one layer at a time.

Let’s talk tools…basic tools.

VISE: Almost any vise will work in the beginning. As long as it is secured (doesn’t move too much) and will hold a hook without slipping, you are good to go. Eventually, you may really enjoy a “true rotary” vise – a vise which allows you to rotate your flies exactly along their hook shank. Vises range from $30 to $100 for something reasonable and up to $500 for something engineered with greater precision and materials. I ended up with a “traveler” pedestal vise from Renzetti in matte black – see Renzetti 2300 Traveler (black). It’s small, compact, and very easy to use. It cost approximately $200.

BOBBIN: There are so many different bobbins out there – steel bobbins, ceramic bobbins, ruby bobbins, and more. Again, be careful with inexpensive bobbins (tools). In my case, I bought two inexpensive ($8) bobbins which appeared to have ceramic ends. Didn’t know until after I purchased them, one of the ceramic “donuts” dislodged from the tip. Who would have thought the ceramic portion was actually two ceramic donuts, on at each end. Live and learn. My suggestion you ask? Well, after using a Rite Bobbin, I can’t imagine using anything else, at least at this time. I use the “standard” ceramic Rite Bobbin – very smooth and put together nicely. Here is a reference to the Rite Bobbin (standard). If you find it for less than $30, you’re in good shape. The ceramic tube is smooth enough to thread this bobbin without a threader.

SCISSORS: Having a reasonable pair of scissors makes it so easy to trim materials. Many experts suggest having two sets of scissors, one for the “rough” work and one for the “fine” or precise work. You can find reasonable scissors or nippers (sewing scissors) almost everywhere. Sewing shops will have them too. I use razor scissors by Dr Slick ($25). Dr Slick offers a Lifetime Warranty. Keep in mind, Dr Slick and many other manufacturers make many models for less than $15. I use one pair of scissors, however use a mini set of dikes (jewelry wire cutters) for spooled wire, bead-chain eyes, and other tough materials.

WHIP FINISHER: Not necessary really – your fingers should do perfectly fine. Worst case, pick one up later down the road if you are challenged with the procedure. Here’s a video demonstrating how easy whip finishing can be. I’m sharing this procedure using larger gauge material. Clearly seeing the how the wraps are secured really helps understand what is happening.

BODKIN: I find a bodkin very useful. From coming out hair, fur, and dubbing to manipulating fast drying head cement, a bodkin is a bang-for-the-buck tool. You should not be paying more than $10 for a reasonable bodkin.

HAIR STACKER: This is an important tool – unfortunately, I learned the hard way. I still think they are too expensive for what they offer, so I improvised by finding something else. I use a super smooth 6″ long piece of aluminum tube having a diameter of 5/8″. I believe they are referred to as a tent pole splint. I found mine at REI in the tent section for $5. If you wish to pick up an actual stacking tool, here is a reasonable hair stacker.

DUBBING LOOP: Dubbing a fly seemed a little complicated at first, until I tried it. It is very simply to dub a fly. Learning how to dub a fly offers you an exponential amount of options for being creative. I used a bent paperclip as a dubbing loop the first month I started tying flies. I didn’t want to pay the $15 or $20 for a simple hook and decided to make my own – it worked perfectly. I have since made a nicer version from brass tubing. If you are looking to purchase a simple tool for dubbing, hear is a reasonable dubbing hook.

HEAD CEMENT: From Crazy Glue (Zap-A-Gap) to UV curing goo, there are so many glues/ cements on the market. Another good gel like cement is LocTite Ultra Gel Super Glue. It seems to stay where it’s applied and is easy to work with. I use Sally Hansen’s Hard As Nails. You can pick it up for $3 at your local drugstore. You may have to wait a few minutes for it to dry, so stick the fly in a wine cork on the back of the bench for a bit. The next time your vise is empty, throw it back in the vise and apply a good second coat.

The information above should offer some insight prior to purchasing fly tying tools. Remember, reasonable fly tying kits (including starter materials) for less than $100 give you enough to start tying, however chances are a majority of the kit will be replaced in due time. Questions or comments? Please feel free to reply to this post below – We will be glad to offer additional advice or information specific to your needs.

See related post titled Fly Tying Materials: Where Do You Start? for suggested materials to get you started tying flies today.

Bendbacks: Beat the Turtle Grass


Fly tying can be so simple and easy – they can also be intricate and complex. Bend-back flies can have minimal material and be tied quickly. Great thing about this particular design is the fact it’s weedless.

Today, finding pre-bent hooks is a challenge. Not to fear, grab a pair on needle-nose pliers and bend them to work. It isn’t necessary to put hooks in a vise before bending, however if it makes it easier for you, go for it. Key considerations should be taken for bending the eye-portion of the hook back along the hook shank – keep the point of the hook and eye in the same plane. In addition, most will bend the eye back too far. Try not to exceed bending the eye back more than eight (8) degrees or so. On a standard size hook, the eye and 25% of the shank should be bent back. This will allow a nice cradle for bead-chain eyes and some room to secure bucktail or other wing material. Blend different colors of bucktail to make things more creative. Feel free to browse our selection of bend-back flies for further examples.

The featured images below are examples of how simple bend-back fly construction can be. Securing a set of bead-chain eyes and some bucktail will make a fly like this complete. I like to add a few strands of crystal flash while I’m at it – let your creativity run wild.

Questions or comments? Please feel free to reply to this post below – We will be glad to offer additional advice or information if needed.