Many resources are available on the net these days, all advising which knots are best for rigging a fly-line and leader. A majority of these knots have a similar breaking strength, especially when you look at all the loose variables in tying them. For example, how many wraps were used, are the adjoining lines similar in size, is one line monofilament and the other fluorocarbon, etc. If a super strong knot is used for tying the wrong materials together, the knot won’t live up to it’s tested breaking strength.
Keep in mind, some knots are easier to tie in the elements (i.e. darkness, cold temperatures, high wind, etc.). One main goal in my post today is to give readers a sense of peace when it comes to choosing what knots work best when rigging fly-lines and leaders. Choose strong, easy-to-tie, and low profile knots in the beginning may be your best bet. If you are after monster fish, well, seek professional guides who specialize in landing trophy fish. Ask for “fish specific” advice on the best knot for your application.
[row][column size=’2/3′]
Reel Spool & Backing
Let’s start with securing your fly-line backing to the reel. Simply said, best way to secure backing to your spool is to use an Arbor knot. This is unanimous advice in almost every book and every resource on the net. Good practices include making several wraps around the spool before securing the knot. This will more evenly distribute the pressure if by chance you ever end up losing all your line to a fish.
Backing to Fly-Line
Knots will differ slightly based on how your fly-line is terminated. Quite a few of the new fly-lines today come from the manufacturer with a welded loop on each end. If you haven’t fly-fished in the last few years, this welded loop will be a new feature.
With Welded Loops – You will need to tie a loop for the adjoining end of your backing – this will be secured loop-to-loop with your fly-line. It is advised to tie the adjoining loop large enough to pass a fly-line spool clean through the loop, say maybe a loop eight inches (8″) in length. This larger loop makes it easier to swap out fly-lines when necessary. Loops most often tied in backing for this purpose are the Surgeon’s Loop, or the Bimini Twist. The Surgeon’s Loop is simple and for quick applications is tied most often. Use at least three (3) wraps to make secure and remember to tie an eight inch (8″) loop. The Bimini Twist is tied much more easily with two people, however can be tied by one person with a little practice. This is the strongest loop – it’s breaking strength is rated the highest of all loop knots.
Without Welded Loops – Traditionally, the Nail knot was used for tying backing to fly-lines. It is a low profile knot and is typically used for greater strength with dissimilar line diameters. For some time now, a more popular knot used for securing backing to fly-line is the Albright knot. It also is used for securing to lines of dissimilar diameters. More fly-fishing experts seem to use the Albright knot more than any other.
Fly-Line to Leader
Here as well, knots will differ slightly based on how your fly-line is terminated. Below are solutions for lines with welded loops and some for lines without welded loops. Some experts say to get fly-lines to transfer energy from fly-line to leader more efficiently, using heavier monofilament is better for the base portion of your leader. Evidently, monofilament is advised for its flexibility and larger gauge. There are positive arguments for using fluorocarbon, however they don’t seem as convincing.
With Welded Loops – You will need to tie a loop for the base of your leader – this will be secured loop-to-loop with your fly-line. The loop is used for easily swapping out leaders when necessary. Loops most often tied in leaders are the Surgeon’s Loop, or the Perfection Loop. RIO (a major supplier of high quality fly lines and leaders) supplies their tapered leaders with hand tied Perfection Loops. This might suggest a Perfection Loop is a solid way to go. I also prefer the Perfection Loop – it is extremely fast and easy to tie.
Without Welded Loops – Traditionally, the Nail knot is renown for tying the base portion of the leader to fly-lines. It is a low profile knot and is typically used for greater strength with dissimilar line diameters. As an old-school guy, I’ve always liked the look of a good Nail knot and feel like it moves through the guides a little easier, especially if you lube it with a little Chapstick. Typically this base portion of the leader is 40 or 50 pound monofilament (for saltwater applications) and should be at least two (2) feet long. The end of this base portion of leader can be terminated with a Surgeon’s Loop or Perfection Loop – it will allow for quickly swapping out leaders when fishing conditions so demand. If you are going to use a Surgeon’s Loop, make at least two (2) full wraps when using larger gauge monofilament.
Leader to Leader (tippet)
As you move past the base or butt section of monofilament leader, it would be advised to use fluorocarbon for the remaining leader and tippet. Fluorocarbon is not only thinner than monofilament, but is harder and somewhat stiffer. When stepping down portions of leader to meet your tippet, there are two knots that seem most popular, specifically the Surgeon’s knot and the Blood knot. Many find the Surgeon’s knot easy to tie. A small drawback to this knot is how square it can be. If you have smaller diameter line, use at least four (4) wraps. If you have larger diameter line, use at least two (2) full wraps. The Blood knot is my knot of choice. It not only has a reasonable profile (slips through guides nicely), but is very strong. Believe it or not, you can tie Blood knots very quickly.
Tippet to Fly
Many knots exist for securing flies to tippets. In freshwater fly-fishing, or when you need a fly to specifically behave as one with the line, an Improved Clinch knot is still used most often. In saltwater however, flies are fished below the surface and should move independent from the line. In this case, an open loop secures the fly to the line or tippet. This allows for more natural movement of the baitfish, shrimp, crab, etc. An endless amount of loop knots exist, however three of the most popular include the Non-Slip Mono, Perfection Loop, and Surgeon’s Loop. I use the perfection Loop as it is very quick to tie and is rated one of the highest for breaking strength. Remember to tie your loop relatively small. A good rule of thumb is to make your loop less than one quarter the length of your fly.
One last tip: If you are one to tie your own leaders like most other fly fishing experts, always carry some tapered leaders for contingency. If for some reason you have run out of leader or tippet material, having a quick and easy tapered leader ready to go is huge, especially if you are a good distance away from the boat, marina, or your lodge.
Questions or comments? Please feel free to comment/ reply to this post below – We will be glad to offer any additional advice.
[/column]
[column size=’1/3′]

Arbor Knot
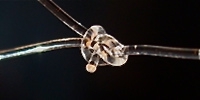
Welded Loop

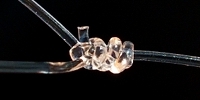
Surgeon’s Loop Knot

Bimini Twist
Albright Knot

Surgeon’s Loop Knot
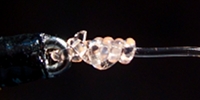
Perfection Loop Knot
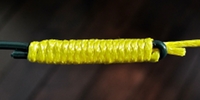
Nail Knot
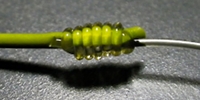
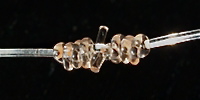
Surgeon’s Knot
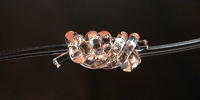
Blood Knot
Improved Clinch Knot
Non-Slip Mono Loop Knot
[/column][/row]